Category: Land Rover

  • Son of Huck!

    After having my Defender 110 stolen and the insurance paying out what I paid for it, I realised I really should have updated my policy as the value of 200Tdi Defenders started to rise. So with £5,500 in my pocket and some savings in hand, I upgraded to a TD5 but downgraded to a shorter wheelbase.

    It has a little bit of “Kangarooing” under high revs, no anti-rollbars, suspension needs a revamp, middle jump seat instead of a cubbybox, chassi is looking like it might need renewing inside three-five years, the wrong bonnet (but I’ll keep that), a leaking steering box (but Huck did too), winch bumper but no winch, only a single battery, pathetic headlights.. etc.. etc..

    Should keep me amused for a while.

  • Huck stolen!


    My faithful Land Rover Defender was stolen on Tuesday 11th December 2018. I am gutted. I’ve owned the car for about six years and spent a lot of time, effort and money on keeping it running as well as upgrading things on it. Somebody out there decided they would just take it because they could. For them it was a pile of money parked on the road which they felt entitled to break into and drive away. To me it was much much more.
    I am sure the insurance will eventually pay some money out after the next few weeks of them investigating it. I expect I’ll get less than I paid for it and not enough to be able to replace it with a similar vehicle. I will also never again see the personal possessions in the vehicle. Some I bought, some were gifts. I had a few tools that I inherited from my deceased father. Maybe a few pounds in cash value but a fortune to me sentimentally. I used to take pride in the fact I was using my Dad’s tools to keep ‘Huck’ on the road.
    None of this will worry the people that stole my car. They will strip it down, burn it out or ship it abroad for sale and I will probably never see it again.
    If you do see a white Land Rover Defender, K451 FYN please call the police on 999 or post to Landywatch.

  • Land Rover Defender Wading Plug Location

    If you own a Land Rover Defender and on occasion wade through water, you should understand where your wading plugs are.
    Wading plugs prevent water getting into bits of your engine that don’t like getting wet. They are not as critical as water getting into your air intake, but if you get the chance before you go knees deep in the wet stuff, plug those holes!
    If you don’t have any, buy a pair. If yours are permanently installed, you should consider removing them to prevent oil fouling your timing belt. But that is to be honest, a matter of opinion vs. the maintenance guides. For example: http://forums.lr4x4.com/index.php?showtopic=9219
    Fitting Wading Plugs
    Slide in behind your front wheel and you can plug the timing belt case as shown here. (Yes, I do use yellow plugs to make it easier to find them afterwards.)
    Fron Wading Plug
    I have marked the next one in red, purely to make it easier in any comments or feedback. This one is just behind the sump and into the bottom of the flywheel housing and prevents water getting onto your clutch plate. Not every engine has one here. If you do though, plug this one too.
    Rear Wading Plug
    This guide is based on a 1993 Defender 110 with a 200tdi engine and LT77s gearbox. Yours may differ if it is more modern than mine, but this still covers an awful lot of vehicles and hopefully will be useful to somebody


  • Land Rover Defender Headlight Wiring Upgrade

    One of the joys of owning a Land Rover Defender is that you can fix a lot of stuff on it yourself. When it is an old one like my 20yr old 200tdi, you can also turn your hand to improving it, where the original engineers didn’t have the technology or budget at the time.
    Why Upgrade the wiring?
    One key failing of the Defender up to and a little beyond my model is the lack of relays between the battery and the headlights. This generally leads to the headlight switch burning out and will give a dimmer headlight than modern cars. Also, if you upgrade your headlights or bulbs, this modification is pretty much essential.
    There is a great little video on YouTube which is a great place to start: BushmanProductionsAU Tutorial, so treat my ramblings here as what I did next after watching it…
    The Diagram
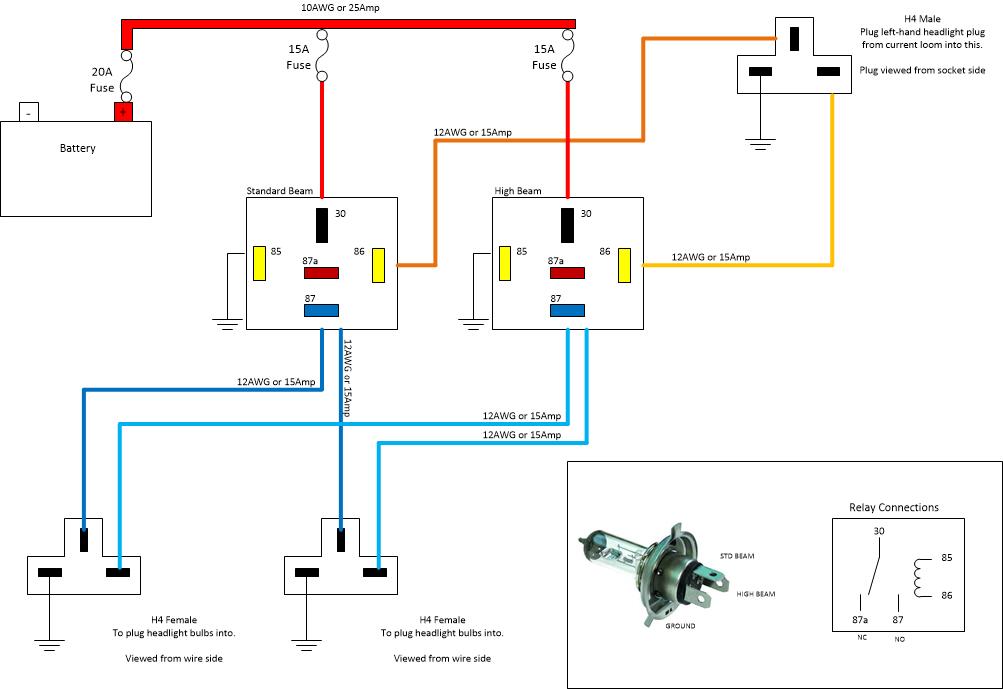
    There is a diagram of how I did it, which hopefully makes sense. It purposefully isn’t a wiring schematic using auto-electrical symbols because I expect most people reading this are enthusiasts, not electricians.
    Buy What You Need
    First thing to get right is not to waste money on a “headlight upgrade kit” because all the bits you need are easy to obtain. I strongly recommend you visit Vehicle Wiring Products to source the stuff you need.

    • 3x in-line fuse holders (or a mini fusebox)
    • 1x 20Amp fuse
    • 2x 15Amp fuses
    • 2x 5-blade changeover relays
    • 2x relay sockets
    • At least 10 female crimp connectors
    • Enough red  10AWG/25Amp cable to go from your battery to the relays
    • Enough 12AWG/15Amp cable to go from your relays to your headlight plug (brown on my diagram)
    • Same again in a different colour (Yellow on my diagram)
    • Some 12AWG to earth pin 85 on each relay and third pin on each headlight to a suitable earth (eg. bodywork)
    • Suitable crimp connectors to connect to your battery
    • 2x H4 female sockets  (these go onto the pins on your bulbs)
    • 1x H4 male plug (this takes the pins from one of your existing headlight plugs)
    • Enough 12AWG to run from your high (full) beam relay to each headlight (pale blue in the diagram)
    • Same again but a different colour for the standard (dipped) beam
    • Two blade connectors and a short length of 10AWG (see below)
    • Enough corrugated plastic shielding to protect all this cable
    • Enough shrink-fit insulation to do a good job protecting those crimps
    • 8x bullet connectors
    • 2x Double-common snap connectors

    Method
    The way I recommend doing it is to fit the two relays in the engine bay, attached to the bodyWork. Somewhere just ahead of the washer bottle is fine.
    Run cable to each headlight to power them from pin 87 of the relays. Note: you will be running two cables from one pin, so you will have a single crimp connector, a short cable to get clear of the relay pins and then your choice of how to take it from here. I had a mountain of bullet connectors handy, so I put a female crimp on a short bit of cable with a bullet on the other end into a “double-common” bullet connector. Each cable out to a headlight was terminated on a bullet connector and just plugged in. But work out your preferred method and substitute your preferred connector types.
    Take a feed from the offside headlight plug itself to pin 86 on each relay. This means you are NOT cutting into your wiring loom, so the fix is 100% removable..
    Now wire-up from the battery (with the big in-line fuse in the battery compartment) and out to pin 87a on the relays (via one fuse each, near the relays). This is the fiddly bit!
    Headlights now always on with sidelights
    So, why are the headlights on dipped beam when you turn on the sidelights?
    The answer is you have a “dim-dip” system installed. This was a legal requirement from April 1987 until 1988. Land Rover still fitted this system long after that but it is not a legal requirement any more.
    All well and good, but what does that mean to us? Inside the nearside wing of your Land Rover is a chunky resister that means when the sidelight circuits are on, some current is passed through the headlights, making them run dim. But, remember we have used a feed from the headlight plug to run some relays. This “dim” voltage is still enough to trip the relays and turn the headlights on full power. We need to disable the dim-dip feature.
    Unscrew the four screws holding on your dashboard instrument panel. Behind the jumble of wires you will see at least two relays. A Yellow one (probably YWB10027L) which stops you leaving the rear heater on when the engine is off and a pink one (YWC10050). This pink one is the troublemaker.
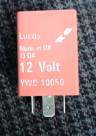
    You can pull the relay and your lights will stop working. You can either short the socket or buy a dim-dip bypass relay. I chose to short it. You need some 25Amp cable and two spade connectors. You simply jumper between 87 and 30 as shown here:
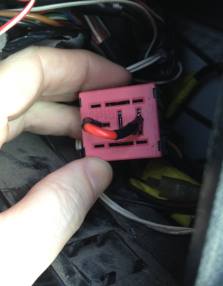
    Put the dashboard back together and now when you turn-on the sidelights, you will just get sidelights. When you tun on headlights, you will not be dragging two headlights full of current through your control stalk on the steering column.
    And now you can upgrade your headlights or just be happy your stock headlights are a little bit brighter.

  • Land Rover Technical Manuals

    Found them. Even the one that says how to track down leaks. Woo hoo!

  • Driving Me Landy

    Took the family out in the Landy. Had to charge the battery again to get it to start. Put half a tank of Diesel in it for £45 and then the seatbelt broke.Family had to sit thee whilst I got the spanners out. So much for going for a relaxing cuppa together.

    Steering is also making a groaning noise at low speeds. Cheap month it won’t be.

    Finally bit the bullet and ordered a Numax CXV-X 1000 battery from Tayna. Would like two really but can only stretch to one at the moment. Two batteries will need a split charge as well.

    Numax CVX-X (1000Amp cca)

    New battery has been a godsend. Starts first time, every time, no matter how cold it has got. I’m now officially ready for winter!

    Seatbelt will come off eBay for about £30. Can’t avoid that either for safety, avoiding license points and to eventually pass the next MOT.

    Steering is just going to have to grind for the moment.

    Looking to purchase a car battery? Buy from Tayna and get next day delivery.

  • Land Rover Jobs

    \"Huckleberry\"

    Having a bit of a think about the Land Rover and totting-up all the jobs that need doing…

    • Remove and spray the light surrounds and radiator grille
    • Change the filters and oil
    • Remove the rusted screws holding the top of the offside underwing pod
    • Replace the bottom strut on all four doors
    • Find out why left-turn indicators go double-speed
    • Sort the creak in the steering when dry steering left
    • Fit a panel to the inside rear door
    • fix the heater fan control
    • tighten the throttle cable
    • various bits of body rust
    • change the rubber seal on drivers-site windscreen attachment
    • Remove, weld and respray bull bars
    • Remove, strip and repaint ladder
    • Replace battery with potentially two in parallel or split-charge
    • Win-top chequer plate
    • Weld hole in rear cross-member
    • Sound-proofing
    • Left rear door lock a bit stiff
    • Tidy rust on rear loading
    • Decide if happy with gear box being a but vague and the occasional grind changing down to second
    • Decide if replacing rubber door seals
    • Find some way to fix all the loose tools etc. floating around in the boot to something solid
    • Fit a new radio with CD player
    • Decide best way to fix pirate flag pole
    • Steering guards and diff-guards for potential green-laning etc.

    Everything else can wait…..